

Product Photography Lighting Techniques
Product photography is an important part of many businesses, as it helps to showcase and sell products to customers. To achieve high-quality product photography, it is essential to use the right lighting techniques.
In this article, we will discuss some of the most effective product photography lighting techniques. By understanding these techniques and how to use them effectively, you can create professional-quality product photographs that showcase your products in the best possible light.
Table of Contents
Product Photography Lighting Techniques
There are several lighting techniques that can be used to achieve high-quality product photography. Some of the most effective techniques include:
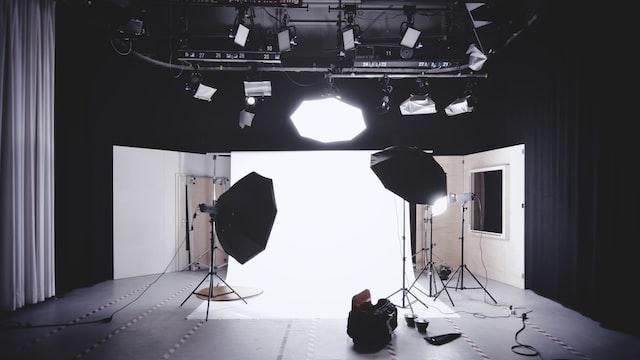
Studio lighting: This involves using specialized studio lights, such as strobes or continuous lights, to illuminate the product. Studio lighting can be used to create a range of lighting effects, such as soft, diffused light or harsh, dramatic shadows.
Natural lighting: Using natural light, such as sunlight or ambient light from a window, can be a great way to achieve soft, natural-looking lighting for product photography.
Reflectors: Reflectors can be used to bounce light back onto the product, filling in shadows and adding dimension to the image.
Light tents: Light tents are small, portable studios that use a diffused light source to evenly illuminate the product. They are often used for small or delicate products that may be difficult to photograph using other lighting techniques.
Off-camera flash: Off-camera flash involves using a separate flash unit, such as a speedlight, that is not attached to the camera. This allows the photographer to position the light at different angles and distances from the product, creating a range of lighting effects.
Overall, the best lighting technique will depend on the type of product being photographed and the desired look and feel of the image. Experimenting with different techniques and lighting setups can help you find the approach that works best for your needs.
Explaining Each Product Photography Lighting Technique
Studio Lighting
Studio lighting for product photography involves using specialized lights, such as strobes or continuous lights, to illuminate the product. Studio lighting can be used to create a range of lighting effects, such as soft, diffused light or harsh, dramatic shadows.
One common studio lighting setup for product photography is called “three-point lighting.” This involves using three lights to illuminate the product: a key light, a fill light, and a backlight.
The key light is the main light source and is usually placed at a 45-degree angle to the product. It provides the primary illumination for the product and creates shadows that help to define its shape and form.
The fill light is used to fill in shadows created by the key light and is typically placed on the opposite side of the product from the key light. The fill light can be diffused or bounced off a reflector to create a softer, more natural-looking light.
The backlight is placed behind the product and serves to separate the product from the background. It can be used to create a rim light around the edges of the product or to highlight specific details.
By adjusting the intensity, direction, and color temperature of the studio lights, photographers can create a range of lighting effects for product photography.
For example, using a soft, diffused key light and fill light can create a natural, flattering look, while using a harsh, directional key light and no fill light can create a more dramatic, high-contrast image.
Natural Lighting
Natural lighting for product photography involves using sunlight or ambient light from a window to illuminate the product. Natural lighting is often preferred for product photography because it can create soft, natural-looking light that is flattering to the product and helps to highlight its colors and details.
To achieve high-quality product photography using natural lighting, it is important to consider the direction and intensity of the light source.
Soft, diffused light can be achieved by shooting on an overcast day or by shooting near a window that has sheer curtains or other light-diffusing materials.
Hard, directional light, on the other hand, can create harsh shadows and high contrast, which may not be ideal for some types of products.
Another important consideration when using natural lighting for product photography is the color temperature of the light. Different times of day and different weather conditions can create different color temperatures, which can affect the way colors are rendered in the photograph.
For example, sunlight is generally cooler in the morning and evening, while it is warmer at noon. This can be corrected using white balance settings on the camera or by using color correction filters.
Reflector Lighting
Reflector lighting for product photography involves using a reflector to bounce light back onto the product, filling in shadows and adding dimension to the image. Reflectors are often used in conjunction with other lighting sources, such as studio lights or natural light, to fine-tune the lighting on the product.
There are several types of reflectors that can be used for product photography, including white, silver, gold, and black reflectors. Each type of reflector has its own characteristics and can be used to achieve different lighting effects.
- White reflectors are the most versatile and can be used to fill in shadows or add a soft, diffused light to the product.
- Silver reflectors are highly reflective and can be used to add specular highlights or create a high-contrast, shiny look.
- Gold reflectors are warmer in tone and can be used to add a warm, golden glow to the product.
- Black reflectors absorb light and can be used to create deep, dramatic shadows.
To use a reflector for product photography, place it opposite the main light source, angled towards the product. This will bounce light back onto the product, filling in shadows and adding dimension to the image. Adjust the position and angle of the reflector to fine-tune the lighting on the product.
Light Tents
Light tents are small, portable studios that use a diffused light source to evenly illuminate the product. They are often used for small or delicate products that may be difficult to photograph using other lighting techniques.
Light tents typically consist of a transparent fabric or plastic material that is supported by a frame. The product is placed inside the tent and a light source is placed outside the tent, pointing towards the product.
The diffused light passes through the transparent material, illuminating the product evenly and without harsh shadows.
One of the benefits of using a light tent for product photography is that it allows the photographer to control the lighting on the product and create a consistent, evenly lit image.
Light tents are also portable and easy to set up, making them a convenient choice for photographers who need to shoot on location or on a tight schedule.
To use a light tent for product photography, first set up the tent and place the product inside. Adjust the position of the light source to achieve the desired lighting effect, and use a tripod and a remote shutter release to ensure that the camera is stable and the image is sharp.
Off-Camera Flashes
Off-camera flash for product photography involves using a separate flash unit, such as a speedlight, that is not attached to the camera. This allows the photographer to position the light at different angles and distances from the product, creating a range of lighting effects.
Off-camera flash can be used in conjunction with other lighting sources, such as studio lights or natural light, to fine-tune the lighting on the product. It can also be used as the primary light source for product photography, particularly in situations where other lighting options are not available or are not suitable.
To use off-camera flash for product photography, first set up the flash unit on a light stand or other support, positioning it at the desired angle and distance from the product.
Use a sync cord or a wireless trigger to synchronize the flash with the camera. Experiment with different flash power settings and diffusers to achieve the desired lighting effect.
One of the benefits of using off-camera flash for product photography is that it allows the photographer to control the lighting on the product and create a range of lighting effects, such as soft, diffused light or harsh, dramatic shadows.
It is also a portable and flexible lighting option that can be used in a variety of situations.
Product Photography Lighting Techniques: Final Thoughts
Product photography lighting techniques are a crucial element of product photography, and there are many different techniques that can be used to achieve high-quality images.
Whether you are using studio lighting, natural lighting, reflectors, light tents, or off-camera flash, it is important to consider the type of product being photographed and the desired look and feel of the image.
By understanding and mastering these lighting techniques, you can create professional-quality product photographs that showcase your products in the best possible light.
With a little experimentation and practice, you can find the lighting approach that works best for your needs and helps you to create beautiful, compelling product photographs.